I think there's a need to create a post that explain how to create the Organisational Structure in a simple way, and it's no doubt that there are few more professional application out there to create Organisational Structure for larger company. The following will be a step by step process for Organisation Structure in Microsoft Powerpoint .
 Microsoft Powerpoint application, for those of you that knows, this is an application that mainly use for creating the presentation, and some statistics charts are able to created in the Microsoft Powerpoint application too.
 The first step when we opened the Microsoft Powerpoint, you must to have a clear organisational Structure draft in mind, and this is the matter of how prepare you are when attending to the organisation team.
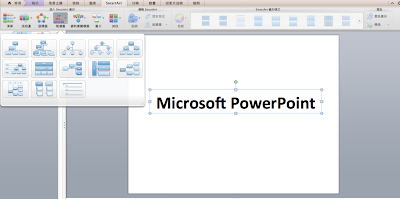
After that, you would find a block on the top called "SmartArt", which is the fifth block counting from the left and right side.
 Once you select the "SmartArt" button, you would then see a few sample chart including the one to create the Organisational Structure, it's called "Hierarchy", which is also the fourth one counting from the left hand side, which shown on the picture below.
 Once you select the "Hierarchy" button, you will see a range of style for Hierarchy chart, so you then select the style that you would like to use. In my case, I selected the basic style for my Organisational Structure.
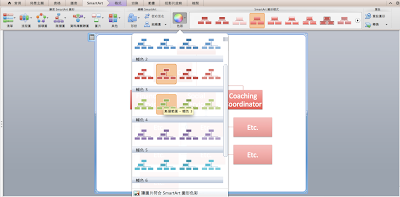
After you select a hierarchy structure, you will see it automatically appear on your Powerpoint Screen, which the picture shown beside.
You can start to put the position into the box, listed as CEO or President on the top and the rest of the position after that. There's a option of adding boxes and moving the boxes around on the block column, so if you Organisational Structure is deep and lots of positions to add, you are able to do that by clicking the add button.
 Finally, you are able to change color of the words and box to make it easier to understand.
 The final draft of the organisation structure can be save as picture to the desktop, and once that is done, your self-created Organisation Structure is completed.
Here is the step by step process for creating the Organisation Structure, and it can be a useful skill to have, and again, although there are other more professional application to create Organisation Structure, the Microsoft Powerpoint is the application that everyone can easily get if the Microsoft were installed into you home computer or laptop.
I hope this blog post is useful to anyone who doesn't know Microsoft Powerpoint can create the Organisational structure.
There will be more skills-to-tell in my blog, so keep checking out my blog.
Click here for Part 1.
Billy

No comments:
Post a Comment
Note: only a member of this blog may post a comment.